开发代码规范
HTML、CSS、JavaScript 编码规范
- JavaScript 符合 ESLint 预定义的 eslint:recommended 编码规则。
- HTML、JavaScript 代码风格符合 Prettier 工具的默认规则。
- CSS 符合 StyleLint 工具的 stylelint-config-standard 编码风格规则。
1、代码质量规范
前端代码使用ESLint、Stylelint工具做质量检测。
2、代码风格规范
前端代码使用Prettier工具进行代码风格的统一。
ESLint
ESLint 简介
ESLint 是一个检查代码质量与风格的工具,配置一套规则,就能检查出你代码中不符合规则的地方,部分问题支持自动修复;
总结起来就两个功能:
- 代码质量检查
- 可以发现代码中存在的可能错误,如使用未声明变量、声明而未使用的变量、修改 const 变量、代码中使用debugger等等
- 代码格式化
- 可以用来统一团队的代码风格,比如加不加分号、使用 tab 还是空格、字符串使用单引号 等等
ESLint是一个插件化的代码检测工具,正如它官网描述的slogan:
可组装的JavaScript和JSX检查工具
ESLint不仅可以检测JS,还支持JSX和Vue,它的高可扩展性让它能够支持更多的项目。
刚开始ESlint的推出并没有撼动JSHint的霸主地位,由于ESlint需要将源码转为AST,而JSHint直接检测源文件字符串,因此执行速度比JSHint慢很多;真正让ESLint实现弯道超车的是ES6的出现。
2015年,ES6规范发布后,由于大部分浏览器支持程度不高,因此需要Babel将代码转换编译成ES5或者更低版本;同时由于ES6变化很大,短期内JSHint无法完全支持,这时ESLint的高扩展性的优点显现出来了,不仅可以扩展规则,连默认的解析器也能替换;Babel团队就为ESLint开发了babel-eslint替换默认的解析器esprima,让ESLint率先支持ES6。
ESLint扩展性好;ESLint的核心是检测AST是否符合规则;
- 第一步:解析器把源码转成AST;ESLint的解析器可自定义,源码用了啥高级语法或者换成TS,可直接换解析器得到最终的AST,eslint就可做规则匹配了;
- 第二步:执行规则;ESLint的检测规则可自定义;
ESLint 使用
安装
npm install --save-dev eslint@8.52.0
配置
项目根目录添加.eslintrc.js文件,内容如下:
module.exports = {
	env: {
		es6: true,
		browser: true,
		node: true,
	},
	parserOptions: {
		ecmaVersion: 'latest',
		sourceType: 'module'
	},
	extends: ['eslint:recommended'],
	rules: {
		// 生产模式不允许使用log
		'no-console': process.env.NODE_ENV === 'production' ? ['error', { allow: ['error', 'warn', 'info'] }] : 'off',
		// 生产默认不允许使用debugger
		'no-debugger': process.env.NODE_ENV === 'production' ? 'warn' : 'off',
		// 在注释中的 // 或 /* 之后强制执行一致的间距
		'spaced-comment': 'error',
	}
}
module.exports = {
env: {
es6: true,
browser: true,
node: true,
},
parserOptions: {
ecmaVersion: 'latest',
sourceType: 'module'
},
extends: ['eslint:recommended'],
rules: {
// 生产模式不允许使用log
'no-console': process.env.NODE_ENV === 'production' ? ['error', { allow: ['error', 'warn', 'info'] }] : 'off',
// 生产默认不允许使用debugger
'no-debugger': process.env.NODE_ENV === 'production' ? 'warn' : 'off',
// 在注释中的 // 或 /* 之后强制执行一致的间距
'spaced-comment': 'error',
}
}修改package.json,添加eslint命令:
"scripts": {
	"eslint": "npx eslint --ext .js,.vue src",
	"eslint:fix": "npx eslint --ext .js,.vue src --fix",
},
"scripts": {
"eslint": "npx eslint --ext .js,.vue src",
"eslint:fix": "npx eslint --ext .js,.vue src --fix",
},通过npm run eslint 进行代码检测。
通过npm run eslint:fix 进行代码自动修复。
至此ESLint基础配置就完成了。
Vue项目实践
Vue 团队维护着 eslint-plugin-vue 项目,它是一个 ESLint 插件,会提供 SFC 相关规则的定义。
Vue代码应符合 vue3-recommended 编码规则。
官方文档点击这里
规则列表点击这里
安装:
npm install -—save-dev eslint-plugin-vue@9.25.0
使用:
修改.eslintrc.js,如下:
module.exports = {
	…
	extends: ['eslint:recommended', 'plugin:vue/vue3-recommended'],
	rules: {
		…
		'vue/no-unused-vars': 'error',
		'vue/multi-word-component-names': 'off'
	}
}
module.exports = {
…
extends: ['eslint:recommended', 'plugin:vue/vue3-recommended'],
rules: {
…
'vue/no-unused-vars': 'error',
'vue/multi-word-component-names': 'off'
}
}至此Vue项目的ESLint基础配置就完成了。
Vite创建的Vue项目
如果想要在vite运行的时候自动检测eslint规范,并且在页面提示错误信息。
安装:
npm install -—save-dev vite-plugin-eslint@1.8.1
使用:
import { defineConfig } from 'vite'
import eslint from 'vite-plugin-eslint'

export default defineConfig({
  plugins: [eslint()]
})
import { defineConfig } from 'vite'
import eslint from 'vite-plugin-eslint'
export default defineConfig({
plugins: [eslint()]
})React 项目实践
官方文档点击这里
安装
npm install eslint-plugin-react@7.34.1 --save-dev
使用
配置 eslintrc.js 文件。
第一步:使用React的预设,来获得合理的默认值:
"extends": [
	"eslint:recommended",
	"plugin:react/recommended"
]
"extends": [
"eslint:recommended",
"plugin:react/recommended"
]第二步:将“react”添加到插件部分。
{
  "plugins": [
    "react"
  ]
}
{
"plugins": [
"react"
]
}第三步:启用 JSX 支持。
{
  "parserOptions": {
    "ecmaFeatures": {
      "jsx": true
    }
  }
}
{
"parserOptions": {
"ecmaFeatures": {
"jsx": true
}
}
}第四步:设置React的版本号。
settings: {
	react: {
		version: '18.2.0'
	}
}
settings: {
react: {
version: '18.2.0'
}
}启用您想要使用的规则。
  "rules": {
    "react/jsx-uses-react": "error",
    "react/jsx-uses-vars": "error",
  }
"rules": {
"react/jsx-uses-react": "error",
"react/jsx-uses-vars": "error",
}微信小程序项目实践
.eslintrc.js 配置
module.exports = {
  env: {
    es6: true,
    browser: true,
  },
  parserOptions: {
    ecmaVersion: 'latest',
    sourceType: 'module'
  },
  globals: {
    // 微信小程序全局变量
    wx: true,
    App: true,
    Page: true,
    Component: true,
    Behavior: true,
    getApp: true,
    getCurrentPages: true,
    requirePlugin: true,
    requireMiniProgram: true
  },
  ...
}module.exports = {
env: {
es6: true,
browser: true,
},
parserOptions: {
ecmaVersion: 'latest',
sourceType: 'module'
},
globals: {
// 微信小程序全局变量
wx: true,
App: true,
Page: true,
Component: true,
Behavior: true,
getApp: true,
getCurrentPages: true,
requirePlugin: true,
requireMiniProgram: true
},
...
}StyleLint
StyleLint 介绍
StyleLint 是一个强大的、现代化的 CSS 检测工具, 是通过定义一系列的编码风格规则帮助我们避免在样式表中出现错误。
StyleLint 使用
安装
npm install stylelint@14.6.0 stylelint-config-standard@25.0.0 stylelint-order@5.0.0 --save-dev
如果有配置 `customSyntax: 'postcss-less', 那就还需要安装 postcss-less。
npm install postcss-less@6.0.0 --save-dev
注意安装的模块之间的版本号要对上,不然会各种报错。
- stylelint:规则检查工具
- stylelint-config-standard:关于规范、风格约束的规则集,其中已经做了许多规则的配置
- stylelint-order:对css属性进行排序的插件工具
- stylelint-config-recess-order:社区提供的属性排序的规则集
配置
配置 .stylelintrc.js 文件
module.exports = {
	"extends": ["stylelint-config-standard"],
	"plugins": ["stylelint-order"],
  rules: {
    // 保持传统的 rgba() 格式,而不是转换为新的 rgb() 格式,
    "color-function-notation": "legacy",
    // 确保 alpha 值保持为小数格式(如 0.25),而不是百分比格式(如 25%)
    "alpha-value-notation": "number",
  	// 属性排序的推荐设置
    'order/properties-order': [
      'position',
      'top',
      'right',
      'bottom',
      'left',
      'z-index',

      'display',
      'flex',
      'flex-direction',
      'flex-wrap',
      'justify-content',
      'align-items',
      'align-content',

      'width',
      'height',
      'min-width',
      'min-height',
      'max-width',
      'max-height',

      'margin',
      'margin-top',
      'margin-right',
      'margin-bottom',
      'margin-left',

      'padding',
      'padding-top',
      'padding-right',
      'padding-bottom',
      'padding-left',

      'overflow',
      'overflow-x',
      'overflow-y',

      'background',
      'background-position',
      'background-repeat',
      'background-size',
      'background-color',
      'background-clip',

      'border',
      'border-style',
      'border-width',
      'border-color',
      'border-top',
      'border-top-style',
      'border-top-width',
      'border-top-color',
      'border-right',
      'border-right-style',
      'border-right-width',
      'border-right-color',
      'border-bottom',
      'border-bottom-style',
      'border-bottom-width',
      'border-bottom-color',
      'border-left',
      'border-left-style',
      'border-left-width',
      'border-left-color',
      'border-radius',

      'outline',
      'outline-offset',
      'outline-color',
      'outline-width',

      'color',
      'font',
      'font-size',
      'font-style',
      'font-family',
      'font-weight',
      'line-height',
      'text-align'
    ]
  }
}
module.exports = {
"extends": ["stylelint-config-standard"],
"plugins": ["stylelint-order"],
rules: {
// 保持传统的 rgba() 格式,而不是转换为新的 rgb() 格式,
"color-function-notation": "legacy",
// 确保 alpha 值保持为小数格式(如 0.25),而不是百分比格式(如 25%)
"alpha-value-notation": "number",
// 属性排序的推荐设置
'order/properties-order': [
'position',
'top',
'right',
'bottom',
'left',
'z-index',
'display',
'flex',
'flex-direction',
'flex-wrap',
'justify-content',
'align-items',
'align-content',
'width',
'height',
'min-width',
'min-height',
'max-width',
'max-height',
'margin',
'margin-top',
'margin-right',
'margin-bottom',
'margin-left',
'padding',
'padding-top',
'padding-right',
'padding-bottom',
'padding-left',
'overflow',
'overflow-x',
'overflow-y',
'background',
'background-position',
'background-repeat',
'background-size',
'background-color',
'background-clip',
'border',
'border-style',
'border-width',
'border-color',
'border-top',
'border-top-style',
'border-top-width',
'border-top-color',
'border-right',
'border-right-style',
'border-right-width',
'border-right-color',
'border-bottom',
'border-bottom-style',
'border-bottom-width',
'border-bottom-color',
'border-left',
'border-left-style',
'border-left-width',
'border-left-color',
'border-radius',
'outline',
'outline-offset',
'outline-color',
'outline-width',
'color',
'font',
'font-size',
'font-style',
'font-family',
'font-weight',
'line-height',
'text-align'
]
}
}忽略设置
/* stylelint-disable-next-line selector-class-pattern */

/* stylelint-disable-next-line no-descending-specificity */
/* stylelint-disable-next-line selector-class-pattern */
/* stylelint-disable-next-line no-descending-specificity */stylelint 配置说明
// 允许使用双斜杠注释
"comment-style": null,
"selector-pseudo-class-no-unknown": [true, {//      忽略 global 伪类选择器      "ignorePseudoClasses": ["global"]    }],
// 允许使用双斜杠注释
"comment-style": null,
"selector-pseudo-class-no-unknown": [true, {// 忽略 global 伪类选择器 "ignorePseudoClasses": ["global"] }],写 CSS 总结
// 颜色值这样写,stylelint 检测的时候才不会报错。
box-shadow: 0 1px 3px 0 rgba(#000, 0.07);
color: rgba(#ff0001, 0.3);
// 颜色值这样写,stylelint 检测的时候才不会报错。
box-shadow: 0 1px 3px 0 rgba(#000, 0.07);
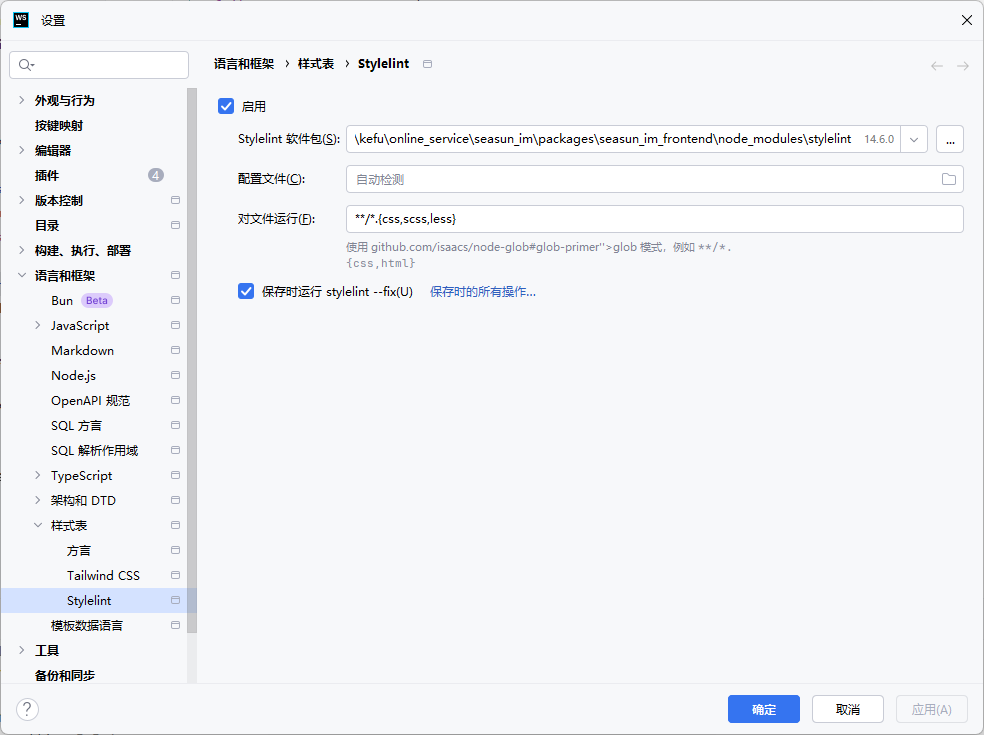
color: rgba(#ff0001, 0.3);WebStrom 配置保存.css .less .scss 文件时候自动格式化代码
总结
- 团队协作统一编码风格:在多人开发的大型项目中,统一的编码风格能够显著降低因样式不一致带来的沟通成本和出错概率。
- 代码审查提高代码质量:自动化的属性排序和检查使得代码审查过程更加严格和高效,有助于维持代码质量。
- 避免常见错误:检测并报告 CSS 代码中的常见错误,比如拼写错误、无效的属性或值、未关闭的括号等。这有助于开发者在代码提交前及时发现并修复这些问题。
- 维护与重构提升工作效率:整齐划一的代码格式让后续的维护和重构工作变得更加轻松,新加入项目的开发者也能更快地理解现有代码,缩短适应代码库的时间。
参考
https://juejin.cn/post/7118294114734440455?searchId=2024031516574914DB2CF497493804EACC
https://blog.csdn.net/m0_60273757/article/details/125762025
https://juejin.cn/post/6844904112274800647?searchId=20240315165559E0A5D692FD025004FAA7
https://juejin.cn/post/6876367482412597262?searchId=2024031516574914DB2CF497493804EACC
Prettier
Prettier 介绍
Prettier (adj. 更漂亮的) 用来进行代码风格的统一,统一的代码风格能保证代码的可读性。
Prettier 使用
安装:
npm install -—save-dev prettier@2.7.1
使用:
在项目根目录添加Prettier配置文件.prettierrc.js。内容如下:
module.exports = {
	printWidth: 120, // 规定一行的最大宽度,在超过设定的宽度后会自动换行。默认为 80。
	tabWidth: 2, // 设定缩进的空格数。默认为 2。
	useTabs: true, // 确定是否使用 tab 进行缩进。默认为 false,即使用空格进行缩进。
	singleQuote: true, // 设定是否使用单引号。默认为 false,即使用双引号。
	semi: false, // 决定是否在语句末尾加上分号。默认为 true。
	trailingComma: 'none', // 规定是否在对象或数组的最后一项后面添加逗号。可选值为 “none”、“es5” 和 “all”。
	bracketSpacing: true // 决定在对象字面量的括号内是否添加空格。默认为 true。
}
module.exports = {
printWidth: 120, // 规定一行的最大宽度,在超过设定的宽度后会自动换行。默认为 80。
tabWidth: 2, // 设定缩进的空格数。默认为 2。
useTabs: true, // 确定是否使用 tab 进行缩进。默认为 false,即使用空格进行缩进。
singleQuote: true, // 设定是否使用单引号。默认为 false,即使用双引号。
semi: false, // 决定是否在语句末尾加上分号。默认为 true。
trailingComma: 'none', // 规定是否在对象或数组的最后一项后面添加逗号。可选值为 “none”、“es5” 和 “all”。
bracketSpacing: true // 决定在对象字面量的括号内是否添加空格。默认为 true。
}使用 Prettier 格式化所有文件:
npx prettier . --write
使用 Prettier 检查文件是否已格式化:
npx prettier . --check
Prettier 与 ESLint 集成
首先,我们先安装eslint-plugin-prettier、eslint-config-prettier 插件,有了这两插件可以让你像运行 ESLint 规则一样运行 Prettier。
安装:
npm install -—save-dev eslint-config-prettier@9.1.0
npm install -—save-dev eslint-plugin-prettier@5.1.3
使用:
修改ESLint配置文件.eslintrc.js:
module.exports = {
	…
	extends: ['eslint:recommended', 'plugin:vue/vue3-recommended', 'prettier'],  //使用 eslint-config-prettier 的规则进行代码检查
	plugins: ['prettier'], // 使用 eslint-plugin-prettier插件调用prettier对你的代码风格进行检查
	rules: {
		 // 违反了 Prettier 的代码格式规则时抛出错误
		'prettier/prettier': 'error',
		…
	}
}
module.exports = {
…
extends: ['eslint:recommended', 'plugin:vue/vue3-recommended', 'prettier'], //使用 eslint-config-prettier 的规则进行代码检查
plugins: ['prettier'], // 使用 eslint-plugin-prettier插件调用prettier对你的代码风格进行检查
rules: {
// 违反了 Prettier 的代码格式规则时抛出错误
'prettier/prettier': 'error',
…
}
}提交前自动检测
eslint 和 prettier 配置完成后,需要配置下lint-staged和husky来实现代码提交前自动检测。
总结
我们统一使用prettier的风格是为了团队和睦,世界和平,我们做出的牺牲都是必要的。而且prettier的样式风格已经在很多大型开源项目中被采用,比如react、webpack、babel。
参考: